How to Find Dispersed Camping Sites: A Step-by-Step Process
How to find dispersed camping sites on public land — the tools, maps, and process we use before every trip, from home research to on-the-ground evaluation.
Finding a dispersed camping site is the hardest part of dispersed camping. The rules are learnable. The gear is buyable. But the actual process of how to find dispersed camping sites — legal ones, good ones, on land where you’re allowed to be — that’s where most people stall out or give up entirely. We’ve watched friends download iOverlander, drive to the first pin, find it taken, and end up at a KOA. That’s not a plan. That’s a hope.
This guide is the complete process we use before every trip. Not a list of apps. Not “check the BLM website.” The full workflow, from the couch to the campsite, covering both National Forest and BLM land. If you’re new to dispersed camping, start with our complete dispersed camping guide for the rules, gear, and fundamentals. This article assumes you know what dispersed camping is and want to get better at finding free camping sites on public land.
The Process — How We Find Every Dispersed Campsite
We’ve refined this over dozens of trips across eight states. The process has three phases: research at home, planning the drive, and evaluating on the ground. Here’s the condensed version:
- Identify the land — determine if it’s BLM, USFS, state, or private
- Check area-specific rules — download the MVUM (USFS) or check the field office (BLM)
- Scout sites digitally — cross-reference dispersed camping apps and satellite imagery
- Plan your drive-in — road conditions, backup sites, offline maps
- Evaluate on the ground — legality, safety, comfort, and exit strategy
Each step builds on the last. Skip one and you’re relying on luck. The deep dive on each follows below.
Step 1 — Identify the Land (Who Manages It?)
Before anything else, answer this question: who manages the land you’re heading to? This determines which tools you’ll use, which rules apply, and where to dispersed camp legally. The four categories that matter:
- Bureau of Land Management (BLM) — 245 million acres, mostly western states. Open desert, canyon country, sagebrush plains. Generally the most permissive for dispersed camping.
- U.S. Forest Service (USFS) — 193 million acres across 154 national forests. Mountain terrain, forest roads, defined camping corridors.
- State land — varies wildly. Arizona allows camping on state trust land with a $15/year permit. Colorado bans it entirely. Utah (SITLA) generally allows it. Never assume.
- Private land — looks like public land more often than you’d think. That open meadow next to the forest boundary might be a ranch.
How to check: Open Gaia GPS — our go-to for dispersed camping map research — and turn on the Public Lands layer. The color coding tells you everything:
- Yellow = BLM
- Green = National Forest (USFS)
- Dark green = National Park (no dispersed camping)
- Other colors = state land (rules vary)
- White/unmarked = private land (no camping without permission)
FreeRoam shows the same information in a cleaner interface if you just need a quick check. onX Hunt and onX Offroad also have public land layers.
The ten minutes you spend learning to read land ownership colors will save you hours of wasted driving. We’ve driven 30 minutes down a dirt road toward an iOverlander pin only to realize — after checking Gaia — that the pin was on private land. The review was two years old. The gate was new. Learn the colors.
Step 2 — Check the Rules for That Specific Area
You know it’s public land. Now check what’s actually allowed on that specific piece of it. This is where people get citations.
For National Forest (USFS) land — download the MVUM:
Reading a MVUM takes about five minutes to learn. Roads are color-coded by vehicle type (passenger car, high clearance, ATV). Green-shaded corridors along roads indicate dispersed camping zones. Some forests allow camping within 300 feet of any open road; others restrict it to marked corridors. The legend on the MVUM tells you which rule applies. We’ve used MVUMs in the Uncompahgre, White River, Grand Mesa, Arapaho, and Pike national forests. Every time, the MVUM showed us legal camping areas that weren’t on any app.
For BLM land — check the field office:
BLM has no equivalent of the MVUM. The process is different and less structured. Go to the BLM state website, find the field office that manages the area you’re visiting, and look for:
- Travel management maps or a BLM camping map for the area (which roads are open)
- Designated camping areas or corridors (some have fees)
- Any closures or restrictions
- Special Recreation Management Areas that require permits
Most BLM land is open to dispersed camping on previously disturbed ground. But “most” isn’t “all.” The BLM land around Moab, for example, has designated corridors with numbered sites and fees up to $20/night. The BLM land around Factory Butte in Utah is wide open with no restrictions. Knowing which you’re headed to matters.
Fire restrictions: Check these before every single trip. They change mid-season with no notice. Go to the local ranger district (USFS) or BLM field office website and look for active fire restriction orders. Stage 1 typically bans campfires but allows stoves. Stage 2 sometimes bans everything. Don’t assume last month’s rules still apply.
Step 3 — Scout Sites Digitally (Apps and Satellite Imagery)
Now you know the land, the rules, and the legal roads. Time to find specific sites. Here are the dispersed camping apps and tools we use — and what each is actually good at.
iOverlander — The largest database of user-reported dispersed camping sites. Thousands of pins with descriptions, photos, and recent reviews. This is where we start when using iOverlander for dispersed camping scouting of established, known sites. The weakness: pins can be outdated, some are on private land, and there’s no built-in land ownership verification. A pin from 2019 might lead to a locked gate. Always cross-reference.
Campendium — Similar to iOverlander but skews toward RV-friendly sites. The cell signal strength data is genuinely useful — each listing includes reported signal for major carriers. Best for: larger rigs, people who need cell signal for remote work, and anyone who wants to filter by amenity.
FreeRoam — Clean map interface with a good public land overlay baked in. Best for: quick visual scanning of an area to see what’s BLM vs. USFS vs. private. Less depth in individual site reviews compared to iOverlander.
Gaia GPS — Our most-used tool for dispersed camping research and verification. The public land layer combined with satellite imagery is unmatched. We use it two ways: first, to verify land ownership of pins from other apps (is that iOverlander pin actually on public land?). Second, to find sites that aren’t in any database — zoom into a forest road on satellite view and look for established pulloffs, clearings, and vehicle tracks. We’ve found some of our best camps this way.
Google Earth / Google Maps satellite view — Free and surprisingly effective for scouting. Switch to satellite view and scan along forest roads or BLM access roads. Look for established pulloffs (visible as light-colored clearings against darker vegetation), fire ring shadows, and vehicle tracks leading to flat areas. We found our favorite San Rafael Swell campsite by scanning Google Earth — a pulloff visible from space that wasn’t on any app.
The cross-reference process — this is the key:
Never trust a single source. Our workflow:
- Find a promising pin on iOverlander or Campendium
- Check land ownership on Gaia GPS — is it actually public land?
- Switch to satellite view — does the site exist? Is there a road to it? Does it look like the description?
- Check the MVUM (USFS) or BLM travel map — is the access road legal?
- Read the most recent reviews — any gate closures, road washouts, or changes?
This takes 10–15 minutes per site. It seems like a lot until you’ve driven an hour to a pin that doesn’t exist anymore. Then it seems like the bare minimum.
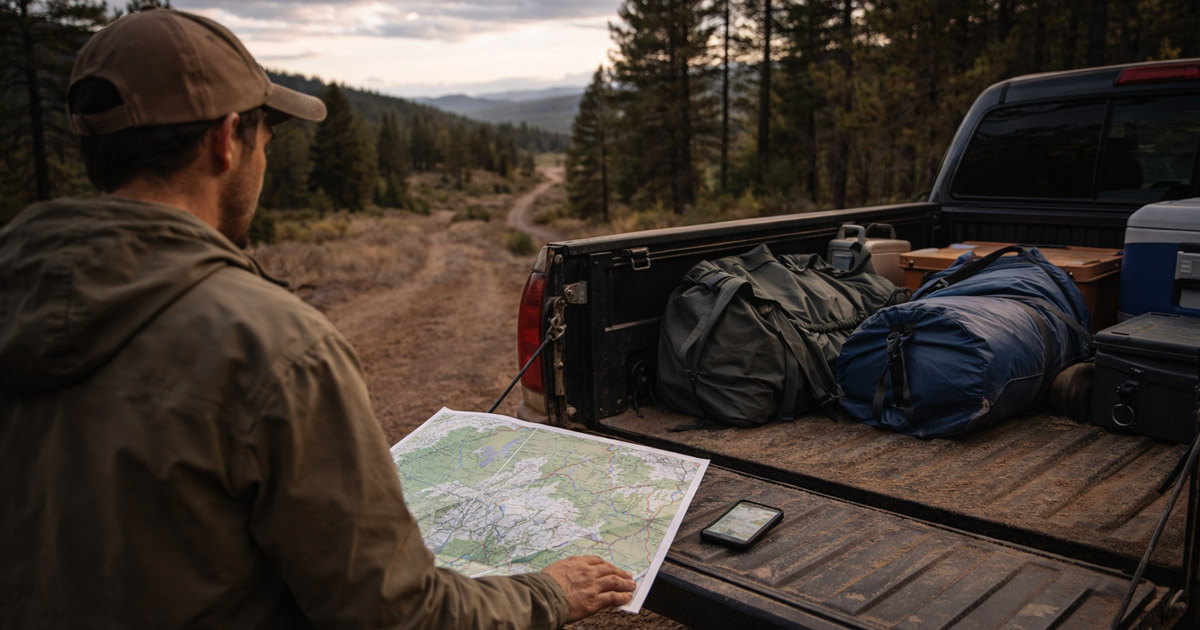
Step 4 — Plan Your Drive-In (Roads, Backup Sites, Timing)
You’ve identified 2–3 candidate sites digitally. Now plan the actual drive.
Road conditions: App reviews are a snapshot in time. A road rated “easy 2WD” in June might be a muddy mess in April or washed out after August monsoons. For current conditions, call the ranger district — it’s free, they’re helpful, and they know roads that no app covers. Check recent iOverlander reviews filtered to the last month. Local Facebook groups and Reddit threads for the area sometimes have real-time road reports.
Vehicle capability: “High clearance recommended” on an app review means different things to different people. A stock Subaru Outback and a lifted Tacoma both have “high clearance.” Be honest about what your vehicle can handle, especially on rocky or rutted forest roads. When in doubt, drive the road in daylight first without committing to a site at the end of it.
Backup sites: Always have 2–3 alternatives identified on different roads. Your first choice will be taken on a Friday evening in April near any popular area. We’ve been skunked on our first choice more times than we can count. The backup plan is what separates a good trip from a KOA story.
Timing: Arrive at least two hours before sunset. New dispersed sites should never be scouted after dark — you can’t evaluate terrain, check for hazards, or assess nearby campers in the dark. If you’re arriving late, camp at a developed campground or a well-reviewed dispersed site you can find in the dark, and scout the area in the morning.
Download offline maps before you leave signal: This catches people every time. Cell signal drops on most forest roads and BLM access roads. Before you leave town, download the area in:
- Gaia GPS (offline maps with public land layer)
- Google Maps (offline area download)
- Avenza Maps (if you’re using a georeferenced MVUM PDF)
If your maps don’t work offline, you’re navigating blind when you need them most.
Step 5 — Evaluate the Site on the Ground
You’ve arrived at the pin. The spot is open. Before you set up, run through this evaluation — it takes two minutes and prevents problems that ruin trips.
Legality check:
- Any signs? Look for “No Camping,” closure orders, private property postings, or designated site markers with fee requirements.
- Are you on a road shown on the MVUM? If you turned off a road that wasn’t on the map, back up.
- Is this actually the land type you expect? BLM boundary markers and USFS signs confirm you’re where you think you are.
Safety check:
- Check overhead: dead trees or large dead branches leaning over the site (widow-makers) are a real hazard in windy conditions.
- Check the slope: will water channel through your site if it rains?
Comfort check:
- Flat enough to sleep? A slight slope is fine — anything over 5 degrees and you’ll slide in your sleeping bag all night.
- Shade: morning shade keeps your tent livable past 7 AM. Afternoon shade keeps your cooler cold. No shade at all means desert camping preparation — see our guide to dispersed camping in Utah for the full heat and shade calculus.
- Wind exposure: ridgetops and open passes get hammered. A site with a natural windbreak (rock formation, tree line, terrain feature) is worth the extra five-minute drive.
- Distance from road: sites right next to a popular forest road get drive-by traffic and dust. A 200-foot setback makes a real difference in solitude.
Exit strategy check:
- Can you turn around without a 15-point turn?
- Can you get out if it rains? Clay and dirt roads become impassable when wet — especially in desert BLM areas. If rain is possible, park facing out.
- What’s your cell signal? Check now so you know what you’re working with for the duration.
Finding Sites on BLM Land vs. National Forest — What’s Different
The process above applies to both, but the tools and terrain differ enough to call out.
National Forest (USFS): The MVUM is your primary tool. Roads and dispersed camping corridors are mapped and defined. The terrain is usually forested, with pulloffs along gravel or dirt forest roads. Sites are often partially hidden by trees. The process is more structured — the MVUM tells you where you can and can’t be. For a forest-by-forest example, see our guide to dispersed camping in Colorado.
BLM land: More open and less structured. There’s no MVUM equivalent — you’re working from field office maps, app pins, and satellite imagery. The terrain is often desert or high desert, which means sites are visible from a distance and from satellite view. You’ll find sites by scanning for pulloffs and clearings along access roads. The trade-off: BLM land requires more self-sufficiency (water, heat management, communication). For the full BLM camping process, see our guide to dispersed camping in Utah.
When you’ll use which: Colorado mountains, Pacific Northwest forests, Sierra Nevada — USFS process. Utah, Arizona, Nevada, eastern Oregon — BLM process. Many road trips involve both, which is why knowing both systems matters.
What to Do When Your Site Is Taken
It will happen. Especially on spring and fall weekends near popular areas. Your first-choice site has a truck in it and a family eating dinner. Here’s the protocol.
Don’t panic. Don’t drive deeper on unfamiliar roads after dark. The worst dispersed camping decisions happen when people are frustrated and losing daylight.
Execute your backup plan. This is why Step 4 exists. Pull up your second choice and drive there. If that’s taken too, go to your third.
Try the “drive and scan” technique. Continue past the occupied site on the same road. Most forest roads and BLM access roads have multiple pulloffs. The first visible site from the main road is always taken first. The one a half-mile further down — around a bend, past a hill — is often empty. We’ve used this technique dozens of times. It works more often than any app.
Ask other campers. Dispersed campers are generally friendly and know the area. A quick “is there another pulloff further down this road?” often yields better intel than any app. We’ve been directed to sites by neighbors that we’d never have found digitally.
Worst case: camp at a developed campground tonight. Find a first-come-first-served campground, pay the $10–$20, sleep in a flat spot with a toilet, and scout the dispersed area in the morning when you have daylight and a clear head. There’s no shame in that. It’s the smart play when the alternative is setting up in the dark on unfamiliar ground.
The Bottom Line
Finding dispersed camping sites is a skill, not a secret. Your first trip takes the most research — maybe an hour of digital scouting and map reading. By your fifth trip, you’ll have a system that takes 20 minutes. By your tenth, you’ll start finding sites that aren’t in any database because you’ll know what to look for on satellite imagery and on the ground.
The tools exist. The public land is there — 438 million acres of BLM and National Forest land across the country. What most guides skip is the process that connects those tools to an actual campsite. That’s what this guide is.
If you want to start right now: download Gaia GPS, turn on the Public Lands layer, and zoom into an area you want to explore. Spend ten minutes learning the colors. Then check the MVUM for the nearest national forest. That exercise teaches you more about finding dispersed sites than anything else you’ll read today.
For the full dispersed camping breakdown — rules, gear, etiquette, and everything else — start with our complete dispersed camping guide.
Frequently Asked Questions
How do you find dispersed camping?
Start by identifying public land — BLM or National Forest — using a mapping tool like Gaia GPS with the public land layer. For national forests, download the Motor Vehicle Use Map (MVUM) to see which roads and corridors allow dispersed camping. Use apps like iOverlander and Campendium to find user-reported sites, then verify land ownership before driving in.
What is the best app for dispersed camping?
No single app does everything. Gaia GPS is best for verifying land ownership with its public land overlay. iOverlander has the largest database of user-reported dispersed sites with reviews and photos. FreeRoam gives a quick public land view. We cross-reference all three — find a site on iOverlander, verify ownership on Gaia GPS, and check satellite imagery before driving.
How do I find free camping sites?
Most dispersed camping on BLM and National Forest land is free. Use the USFS Motor Vehicle Use Map for national forests and the BLM field office website for BLM areas. Apps like iOverlander, FreeRoam, and Campendium show user-reported free camping sites with descriptions and recent reviews. Always verify that the site is on public land before setting up.
Is there a map of dispersed camping?
For national forests, the Motor Vehicle Use Map (MVUM) is the official free map showing roads and dispersed camping corridors. Download it from the USFS website for any national forest. For BLM land, the BLM Surface Management Agency map shows land boundaries. Gaia GPS and FreeRoam combine both into digital overlays you can use on your phone.
How do I know if I can camp somewhere?
Check three things: land ownership (is it BLM, USFS, state, or private?), road legality (is the access road on the MVUM or BLM travel plan?), and area-specific restrictions (any closures, fire restrictions, or designated zones with fees?). If all three check out and you’re on previously disturbed ground at least 200 feet from water, you can camp there.
What is the best website for free camping?
iOverlander.com has the largest database of free dispersed camping sites with user reviews. Campendium.com is strong for RV-friendly sites with cell signal data. FreeCampsites.net covers basic locations. For official information, the USFS and BLM websites have maps and regulations for each unit. We use a combination of these rather than relying on any single source.